Simulation
This chapter describes how to generate building models from
traffic_editor files, and then simulate fleets of robots in those models.
Motivation
Simulation environments for testing robotic solutions offer immense value across various stages of R&D and deployment. More notably, simulations provide the following benefits:
-
Time and resource saving: While testing with hardware is indispensable, the process can slow development with additional setup time, robot downtime and reset periods between trials. As the number of participants scale, so do costs associated with purchasing hardware and consumables for testing. This is especially true when utilizing a solution such as RMF, which aims to integrate several mobile/stationary robots together with building systems such as doors and lifts. Simulations provide a potentially cost-effective and time-saving alternative for evaluating the behavior of robot systems at scale. More importantly, simulations can help answer questions prior to deployment such as how many participants can be supported or how the existing behavior would change with the introduction of a new fleet, both of which can inform purchasing decisions for facility owners.
-
Robust testing: Robots in simulation neither run out of battery nor incur costs when they happen to unfortunately crash into something. Scenarios can be tested for hours at a stretch, at faster speeds, to fine tune algorithms and verify their robustness. One consideration about the appropriate amount of scenario testing to run is a decision that depends on how much compute power you want to avail for the simulation. With the introduction of cloud simulation, this limit is then a trade off of cost and speed as well. As scenarios in simulation are repeatable, fixes for undesirable bugs encountered can be readily validated. Reaction of the system to edge cases which are rare but have severe consequences can also be studied through simulation. Data logged from hardware trials can be used to recreate the scenario in simulation which may be further helpful for debugging. Lastly, long running simulations can instill confidence in facility owners prior to deployment.
Physics-based simulators, such as Gazebo, carry the benefit of easily
interfacing with ROS 2 nodes through wrappers provided by gazebo_ros_pkgs.
Gazebo plugins can be developed that accurately emulate the behavior of robots,
sensors and infrastructure systems which enhance the overall fidelity of
simulations. It is worth emphasizing here that the exact same code used to run the simulations
will also be run on the physical system as well without any changes.
However, despite these compelling benefits, simulations are sparingly employed by developers and system integrators, citing complexity over generating environments and configuring them with appropriate plugins. In a recent publication "A Study on the Challenges of Using Robotics Simulators for Testing," by Afsoon Afzal, Deborah S. Katz, Claire Le Goues and Christopher S. Timperley they noted the main reasons participants gave for not using simulation for a particular project and summarized their findings as follows:
| Reason for not using simulation | # | % |
|---|---|---|
| Lack of time or resources | 15 | 53.57% |
| Not realistic/accurate enough | 15 | 53.57% |
| Lack of expertise or knowledge on how to use software-based simulation | 6 | 21.43% |
| There was no simulator for the robot | 4 | 14.29% |
| Not applicable | 4 | 14.29% |
| Too much time or compute resources | 2 | 7.14% |
| Nobody suggested it | 0 | 0.00% |
| Other | 2 | 7.14% |
The RMF project aims to address these hurdles by simplifying the process of setting up simulation environments for multi-fleet traffic control, as we will explain further throughout this section.
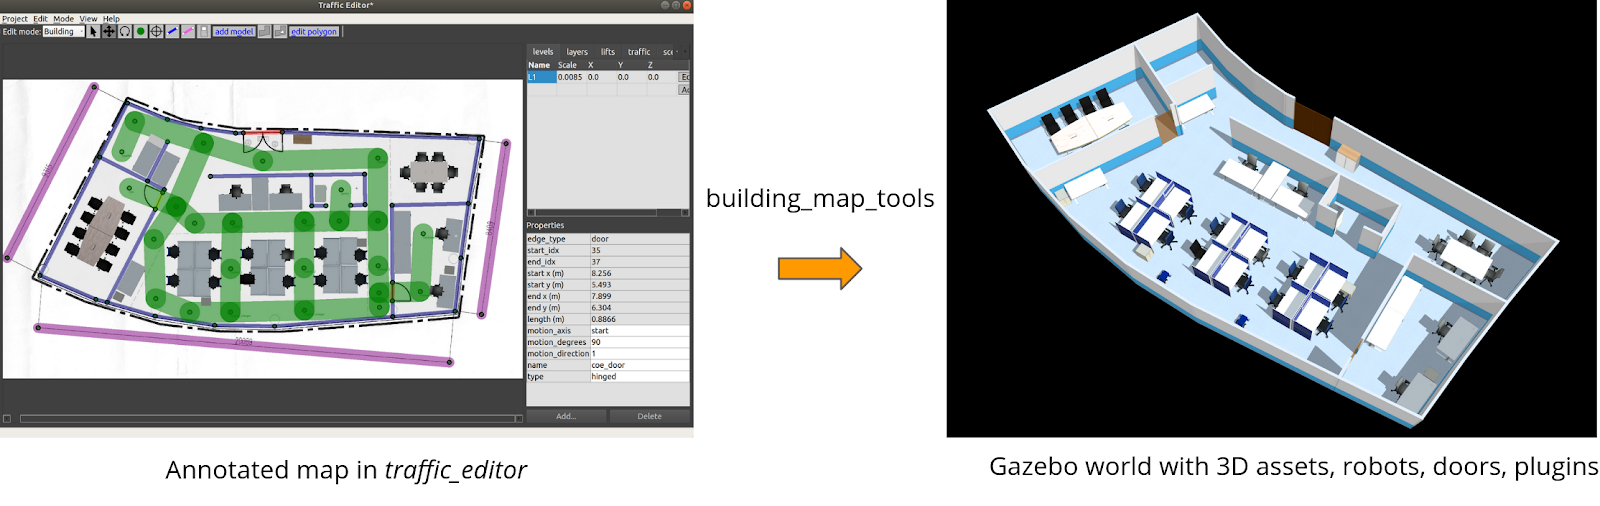
Building Map Generator
traffic_editor, discussed in the previous chapter, is a tool to annotate building
floor plans with fleet-specific traffic information in a vendor neutral manner.
This includes waypoints of interest, traffic lanes and shared resources such as
doorways and lifts. It can also be used to markup the walls and floors and add
thumbnails of artifacts in the environment. The ability to auto-generate a 3D
world using this annotated map is significantly valuable for simplifying the
creation and management of simulations. To this end, the building_map_tools
package in traffic_editor contains an executable building_map_generator. The
executable operates in two modes:
- Generate a Gazebo/Ignition compliant
.worldfile - Export the fleet specific traffic information in the form
of navigation graphs which are utilized by
fleet_adaptersfor planning
To auto-generate a Gazebo simulation world, the executable takes in the command argument gazebo along with others described below:
usage: building_map_generator gazebo [-h] [--TEMPLATE_WORLD_FILE TEMPLATE_WORLD_FILE]
                                     INPUT OUTPUT_WORLD OUTPUT_MODEL_DIR

positional arguments:
  INPUT                 Input building.yaml file to process
  OUTPUT_WORLD          Name of the .world file to output
  OUTPUT_MODEL_DIR      Path to output the map model files

options:
  -h, --help            show this help message and exit
  --TEMPLATE_WORLD_FILE TEMPLATE_WORLD_FILE
                        Specify the template for the base simulation.
The script parses the .building.yaml file and generates meshes for the
flooring and walls for each level. Those meshes are then combined into a model.sdf file in
the OUTPUT_MODEL_DIR/ directory. The model.sdf files for each level are
imported into the .world with filepath OUTPUT_WORLD. Model sub-elements for
various static objects annotated in the traffic_editor are included in the
.world as seen in the snippet below:
<include>
  <name>OfficeChairBlack_6</name>
  <uri>model://OfficeChairBlack</uri>
  <pose>4.26201267190027 -7.489812761393875 0 0 0 1.1212</pose>
  <static>True</static>
</include>
Similar blocks for annotated robots are
generated. It is the responsibility of the user to append the environment
variable $GAZEBO_MODEL_PATH with the relevant paths to the models prior to
loading the .world file in Gazebo. This process can be simplified through ROS 2
launch files and will be discussed in later sections.
The parser also includes sdf elements for other dynamic assets such as doors and lifts. Their mechanisms are discussed in the next section.
By default, the simulation world is loaded without any additional plugins. So if
you were to spawn things like cameras or lidars in your gazebo world it would not
work. This can be bypassed by using the --TEMPLATE_WORLD_FILE. This allows you
to add additional simulation assets to your world.
Reconfiguring simulation environments becomes as trivial as editing the
annotations on the 2D drawing and re-running the building_map_generator. This
is exceedingly useful to quickly evaluate traffic flow as the spatial
configuration in the facility changes.
To generate navigation graphs for fleet adapters, the building_map_generator
is executed with command argument nav. The navigation graph is generated as
a .yaml file and is parsed during launch by the corresponding fleet adapter.
usage: building_map_generator nav [-h] INPUT OUTPUT_DIR

positional arguments:
  INPUT       Input building.yaml file to process
  OUTPUT_DIR  Path to output the nav .yaml files
RMF Assets and Plugins
Assets play a pivotal role in recreating environments in simulation. Projects such as RMF, SubT and others have allowed developers to create and open source 3D models of robots, mechanical infrastructure systems and scene objects. They are available for download on the Ignition Fuel app. Beyond imparting visual accuracy, assets can be dynamic and interface with RMF core systems through the aid of plugins.
To simulate the behavior of hardware such as robot models and infrastructure systems, several Gazebo plugins have been architected. These plugins are derivatives of the ModelPlugin class and tie in standard ROS 2 and RMF core messages to provide necessary functionality. The following sections briefly describe some of these plugins.
Robots
As highlighted earlier, several robot models (SESTO, MiR100, Magni, Hospi) have been
open sourced for use in simulation. For these models to emulate the behavior of
their physical counterparts which have been integrated with RMF, they need to 1)
interface with rmf_fleet_adapters and 2) navigate to locations in the
simulated world. These functionalities, for a "full control" robot type, are
achieved through the slotcar plugin.
The plugin subscribes to /robot_path_requests and /robot_mode_requests
topics and responds to relevant PathRequest and ModeRequest messages
published by its rmf_fleet_adapter. The plugin also publishes the robot's
state to the /robot_state topic.
To navigate the robot through waypoints in a PathRequest message, a simple
"rail-like" navigation algorithm is utilized which accelerates and decelerates
the robot along a straight line from its current position to the next waypoint.
The plugin relies on these fundamental assumptions:
- The robot model is a two-wheel differential drive robot
- The left and right wheel joints are named
joint_tire_leftandjoint_tire_rightrespectively
Other parameters, the majority of which are kinematic properties of the robot, are inferred from sdf parameters:
<plugin name="slotcar" filename="libslotcar.so">
  <nominal_drive_speed>0.5</nominal_drive_speed>
  <nominal_drive_acceleration>0.25</nominal_drive_acceleration>
  <max_drive_acceleration>0.75</max_drive_acceleration>
  <nominal_turn_speed>0.6</nominal_turn_speed>
  <nominal_turn_acceleration>1.5</nominal_turn_acceleration>
  <max_turn_acceleration>2.0</max_turn_acceleration>
  <tire_radius>0.1</tire_radius>
  <base_width>0.3206</base_width>
  <stop_distance>0.75</stop_distance>
  <stop_radius>0.75</stop_radius>
</plugin>
During simulation, it is assumed that the robot's path is free of static
obstacles, but the plugin still contains logic to pause the robot's motion if an
obstacle is detected in its path. While it is possible to deploy a sensor based
navigation stack, the approach is avoided to minimize the computational load on
the system from running a navigation stack for each robot in the simulation.
Given the focus on traffic management of heterogeneous fleets and not robot
navigation, the slotcar plugin provides an efficient means to simulate the
interaction between RMF core systems and robots.
The slotcar plugin is meant to serve as a generalized solution. Vendors are
encouraged to develop and distribute plugins that represent the
capabilities of their robot and the level of integration with RMF more accurately.
Doors
Unlike robot models whose geometries are fixed and hence can be directly
included in the generated .world file, doors are custom defined in
traffic_editor and have their own generation pipeline. As seen in the figure
below, an annotated door has several properties which include the location of
its ends, the type of door (hinged, double_hinged, sliding, double_sliding) and
its range of motion (for hinged doors).
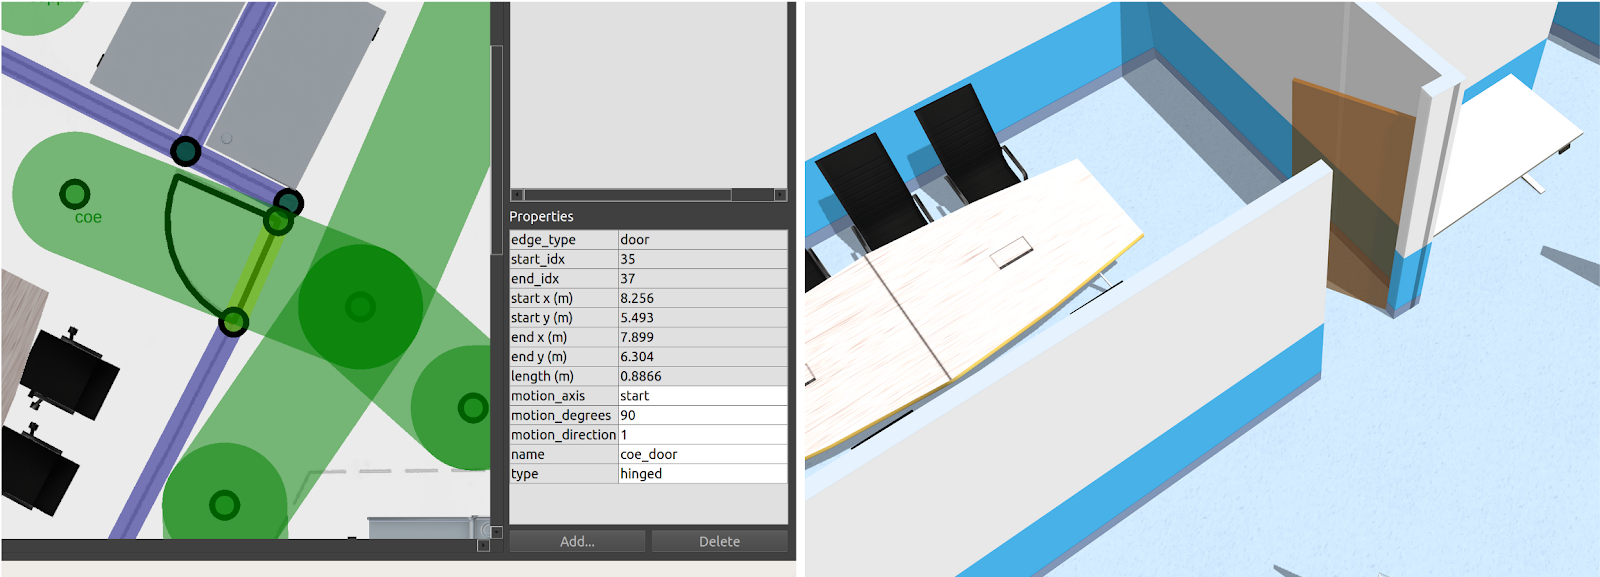
The building_map_generator gazebo script parses a .building.yaml file for
any doors and automatically generates an sdf sub-element with links and joints
required for the door along with a configured plugin. The sdf sub-element
generated for the door in the figure above is presented below.
<model name="coe_door">
  <pose>8.077686357313898 -5.898342045416362 0.0 0 0 1.1560010438234292</pose>
  <plugin filename="libdoor.so" name="door">
    <v_max_door>0.5</v_max_door>
    <a_max_door>0.3</a_max_door>
    <a_nom_door>0.15</a_nom_door>
    <dx_min_door>0.01</dx_min_door>
    <f_max_door>500.0</f_max_door>
    <door left_joint_name="left_joint" name="coe_door" right_joint_name="empty_joint" type="SwingDoor" />
  </plugin>
  <link name="left">
    <pose>0 0 1.11 0 0 0</pose>
    <visual name="left">
      <material>
        <ambient>120 60 0 0.6</ambient>
        <diffuse>120 60 0 0.6</diffuse>
      </material>
      <geometry>
        <box>
          <size>0.8766026166317483 0.03 2.2</size>
        </box>
      </geometry>
    </visual>
    <collision name="left">
      <surface>
        <contact>
          <collide_bitmask>0x02</collide_bitmask>
        </contact>
      </surface>
      <geometry>
        <box>
          <size>0.8766026166317483 0.03 2.2</size>
        </box>
      </geometry>
    </collision>
    <inertial>
      <mass>50.0</mass>
      <inertia>
        <ixx>20.17041666666667</ixx>
        <iyy>23.36846728119012</iyy>
        <izz>3.20555061452345</izz>
      </inertia>
    </inertial>
  </link>
  <joint name="left_joint" type="revolute">
    <parent>world</parent>
    <child>left</child>
    <axis>
      <xyz>0 0 1</xyz>
      <limit>
        <lower>-1.57</lower>
        <upper>0</upper>
      </limit>
    </axis>
    <pose>0.44330130831587417 0 0 0 0 0</pose>
  </joint>
</model>
The door plugin responds to DoorRequest messages with door_name matching its model name sdf tag. These messages are published over the /door_requests topic. The plugin is agnostic of the type of door defined and relies on the left_joint_name and right_joint_name parameters to determine which joints to actuate during open and close motions. During these motions, the joints are commanded to their appropriate limits which are specified in the parent element. The joint motions adhere to kinematic constraints specified by sdf parameters while following acceleration and deceleration profiles similar to the slotcar.
To avoid situations where one robot requests a door to close on another robot, a door_supervisor node is deployed in practice. The node publishes to /door_requests and subscribes to /adapter_door_requests which the fleet adapters publish to when their robot requires access through a door. The door_supervisor keeps track of requests from all the fleet adapters in the system and relays the request to the door adapters while avoiding aforementioned conflicts.
Lifts
The ability to test lift integration is crucial as these systems are often the operational bottlenecks in facilities given their shared usage by both humans and multi robot fleets. As with annotated doors, lifts can be customized in a number of ways in the traffic_editor GUI including the dimension & orientation of the cabin and mapping cabin doors to building levels.
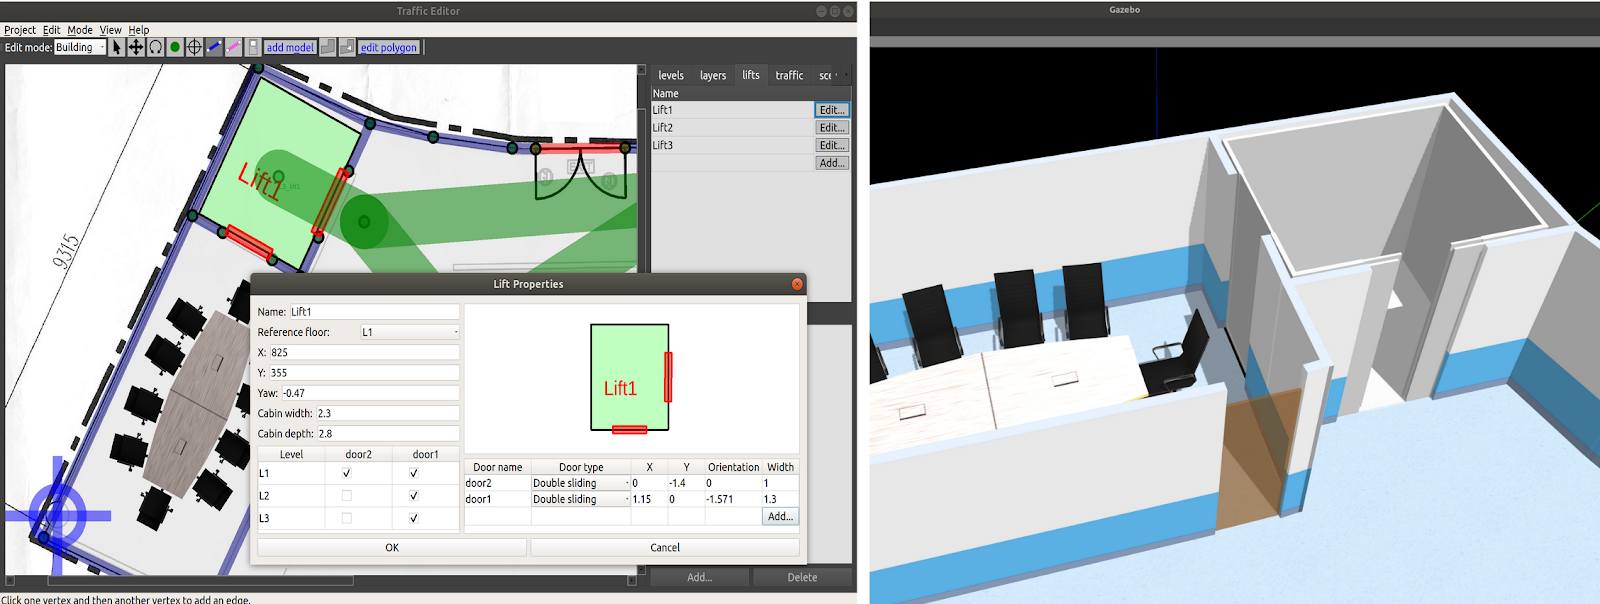
The building_map_generator gazebo script parses the .building.yaml file for lift definitions and auto-generates the sdf elements for the cabin, cabin doors and lift shaft doors.
A prismatic joint is defined at the base of the cabin which is actuated by the lift plugin to move the cabin between different levels.
While the cabin doors are part of the cabin structure, the shaft doors are fixed to the building.
Both sets of doors open and close simultaneously at a given level and are controlled by the lift plugin itself.
These doors are created using the same method as other doors in the building and include the door plugin as well.
The building_map_generator also appends a lift plugin (TODO add link element with required parameters to the lift's model sdf block.)
<plugin filename="liblift.so" name="lift">
  <lift_name>Lift1</lift_name>
  <floor elevation="0.0" name="L1">
    <door_pair cabin_door="CabinDoor_Lift1_door1" shaft_door="ShaftDoor_Lift1_L1_door1" />
  </floor>
  <floor elevation="10.0" name="L2">
    <door_pair cabin_door="CabinDoor_Lift1_door1" shaft_door="ShaftDoor_Lift1_L2_door1" />
    <door_pair cabin_door="CabinDoor_Lift1_door2" shaft_door="ShaftDoor_Lift1_L2_door2" />
  </floor>
  <floor elevation="20.0" name="L3">
    <door_pair cabin_door="CabinDoor_Lift1_door1" shaft_door="ShaftDoor_Lift1_L3_door1" />
  </floor>
  <reference_floor>L1</reference_floor>
  <v_max_cabin>2.0</v_max_cabin>
  <a_max_cabin>1.2</a_max_cabin>
  <a_nom_cabin>1.0</a_nom_cabin>
  <dx_min_cabin>0.001</dx_min_cabin>
  <f_max_cabin>25323.0</f_max_cabin>
  <cabin_joint_name>cabin_joint</cabin_joint_name>
</plugin>
The plugin subscribes to /lift_requests topic and responds to LiftRequest messages with lift_name matching its model name sdf tag.
The displacement between the cabin's current elevation and that of the destination_floor is computed and a suitable velocity is applied to the cabin joint.
Prior to any motion, the cabin doors are closed and only opened at the destination_floor if specified in the LiftRequest message.
As the cabin and shaft doors are configured with the door plugin, they are commanded through DoorRequest messages published by the lift plugin.
Analogous to the door_supervisor, a lift_supervisor node is started in practice to manage requests from different robot fleets.
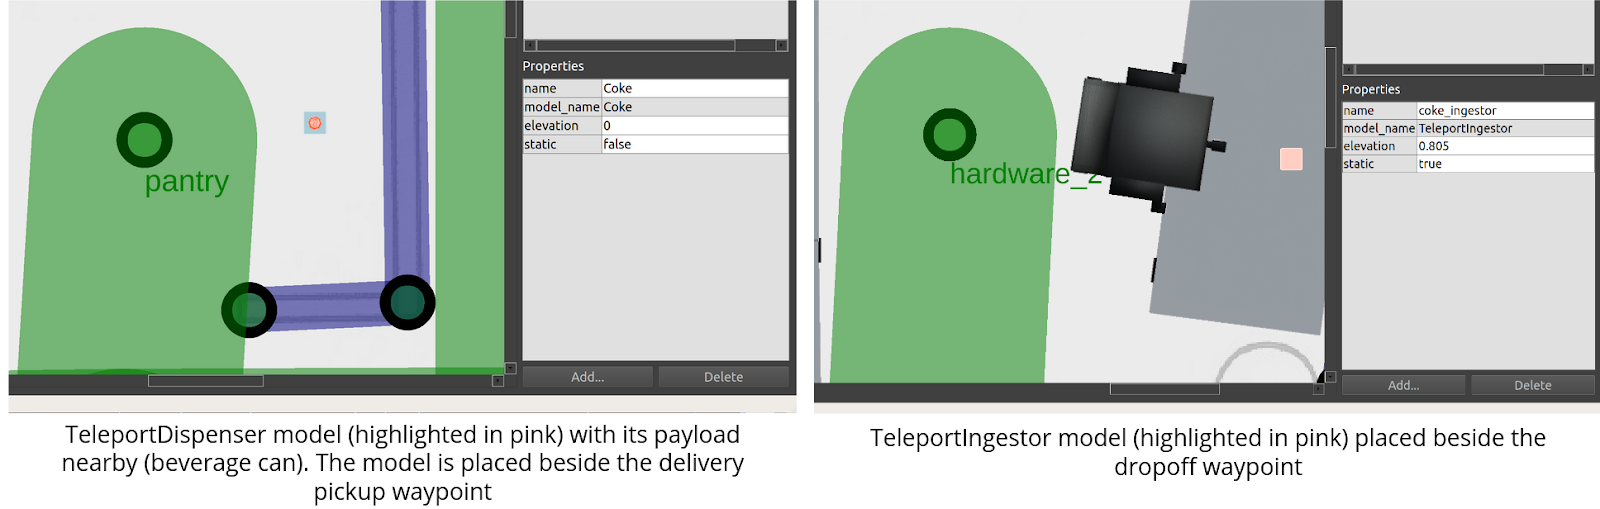
Workcells
A common use case is robots performing deliveries within facilities, so a Delivery task is configured into the rmf_fleet_adapters.
In a delivery task, a payload is loaded onto the robot at one location (pickup waypoint) and unloaded at another (dropoff waypoint).
The loading and unloading of the payload onto and from a robot may be automated by robots/workcells in the facility. These devices are henceforth referred to as dispensers and ingestors respectively.
To replicate the loading and unloading processes in simulation, the TeleportDispenser and TeleportIngestor plugins have been designed.
These plugins are attached to the TeleportDispenser and TeleportIngestor 3D models, respectively.
To setup a payload loading station in simulation:
- Add a
TeleportDispensermodel beside the pickup waypoint and assign it a uniquename - Add the payload model beside the
TeleportDispensermodel (Coke can in image below)
To setup a payload unloading station in simulation:
- Add a
TeleportIngestormodel beside the dropoff waypoint and assign it a uniquename
When a DispenserRequest message is published with target_guid matching the
name of the TeleportDispenser model, the plugin will teleport the payload onto
the nearest robot model. Conversely, when an IngestorRequest message is published
with the target_guid matching the name of the TeleportIngestor model, the
TeleportIngestor plugin will teleport the payload from the robot to its location in
the world. The combinations of these plugins allow delivery requests to be simulated.
In the future, these mechanisms will be replaced by actual workcells or robot arms
but the underlying message exchanges will remain the same.
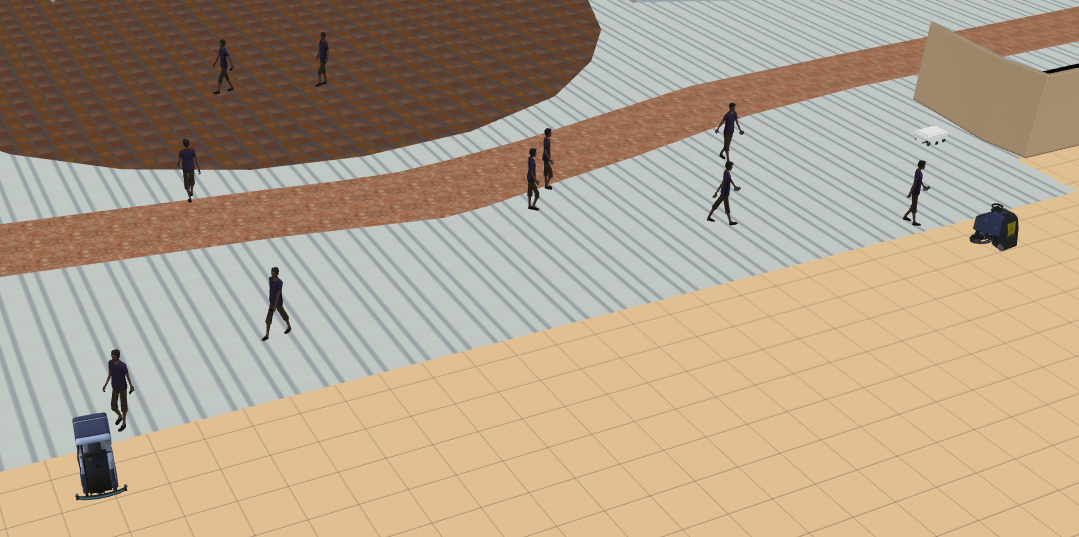
Crowdsim
Crowd Simulation, aka CrowdSim is an optional feature in RMF simulation. User can
choose to enable crowdsim on rmf_traffic_editor. In RMF, the crowdsim plugin uses
menge as the core to control each of
simulated agent in the world.
An example of crowdsim is demonstrated on rmf_demos's airport_world:
ros2 launch rmf_demos_gz airport_terminal.launch.xml use_crowdsim:=1
For more details on how crowdsim works and how to configure it,
please dive in to the detailed guide for using Crowdsim.
Creating Simulations and Running Scenarios
The section aims to provide an overview of the various components in the rmf_demos repository which may serve as a reference for setting up other simulations and assigning tasks to robots. Here, we will focus on the office world.
Map package
The rmf_demos_maps package houses annotated traffic_editor files which will be used for the 3D world generation. Opening the office.project.yaml file in traffic_editor reveals a single level floorplan that has walls, floors, scale measurements, doors, lanes and models annotated. All the robot lanes are set to bidirectional with graph_idx equal to "0". The latter signifies that all the lanes belong to the same fleet. In the airport world, we have two sets of graphs with indices "0" and "1" which reflect laneways occupiable by two fleets respectively. The figure below highlights properties assigned to a lane and a waypoint that serves as a robot spawn location.

To export a 3D world file along with the navigation graphs, the building_map_generator script is used. The CMakeLists.txt file of this package is configured to automatically run the generator scripts when the package is built. The outputs are installed to the share/ directory for the package. This allows for the generated files to be easily located and used by other packages in the demo.
foreach(path ${traffic_editor_paths})

  # Get the output world name
  string(REPLACE "." ";" list1 ${path})
  list(GET list1 0 name)
  string(REPLACE "/" ";" list2 ${name})
  list(GET list2 -1 world_name)

  set(map_path ${path})
  set(output_world_name ${world_name})
  set(output_dir ${CMAKE_CURRENT_BINARY_DIR}/maps/${output_world_name})
  set(output_world_path ${output_dir}/${output_world_name}.world)
  set(output_model_dir ${output_dir}/models)

  # first, generate the world
  add_custom_command(
    OUTPUT ${output_world_path}
    COMMAND ros2 run rmf_building_map_tools building_map_generator gazebo ${map_path} ${output_world_path} ${output_model_dir}
    DEPENDS ${map_path}
  )

  add_custom_target(generate_${output_world_name} ALL
    DEPENDS ${output_world_path}
  )

  # now, generate the nav graphs
  set(output_nav_graphs_dir ${output_dir}/nav_graphs/)
  set(output_nav_graphs_phony ${output_nav_graphs_dir}/phony)
  add_custom_command(
    OUTPUT ${output_nav_graphs_phony}
    COMMAND ros2 run rmf_building_map_tools building_map_generator nav ${map_path} ${output_nav_graphs_dir}
    DEPENDS ${map_path}
  )

  add_custom_target(generate_${output_world_name}_nav_graphs ALL
    DEPENDS ${output_nav_graphs_phony}
  )

  install(
    DIRECTORY ${output_dir}
    DESTINATION share/${PROJECT_NAME}/maps
  )

endforeach()
Launch Files
The rmf_demos package includes all the essential launch files required to bring up the simulation world and start various RMF services. The office simulation is launched using the office.launch.xml file. First, a common.launch.xml file is loaded and starts:
- The
rmf_traffic_schedulenode responsible for maintaining the database of robot trajectories and monitoring traffic for conflicts. If a conflict is detected, notifications are sent to relevant fleet adapters which begin the negotiation process to find an optimal resolution. - The
building_map_serverwhich publishes aBuildingMapmessage used by UIs for visualization. The executable takes in the path to the relevant.building.yamlfile as an argument. Theoffice.building.yamlfile installed by thermf_demos_mapspackage is located using thefind-pkg-sharesubstitution command and is stored in theconfig_fileargument. - The
rmf_schedule_visualizerwhich is an RViz based UI to visualize the traffic lanes, actual positions of the robots, expected trajectory of robots as reflected in thermf_traffic_scheduleand states of building systems such as door and lifts. - The
door_supervisorandlift_supervisornodes to manage requests submitted by fleet adapter and UIs.
<!-- Common launch -->
<include file="$(find-pkg-share demos)/common.launch.xml">
  <arg name="use_sim_time" value="true"/>
  <arg name="viz_config_file" value ="$(find-pkg-share demos)/include/office/office.rviz"/>
  <arg name="config_file" value="$(find-pkg-share rmf_demos_maps)/office/office.building.yaml"/>
</include>
To launch a simulated world in gazebo, a snippet from rmf_demos_gz is shown below. Similarly, user can also choose to run with ignition simulator, rmf_demos_ign
  <group>
    <let name="world_path" value="$(find-pkg-share rmf_demos_maps)/maps/office/office.world" />
    <let name="model_path" value="$(find-pkg-share rmf_demos_maps)/maps/office/models:$(find-pkg-share rmf_demos_assets)/models:/usr/share/gazebo-9/models" />
    <let name="resource_path" value="$(find-pkg-share rmf_demos_assets):/usr/share/gazebo-9" />
    <let name="plugin_path" value="$(find-pkg-prefix rmf_gazebo_plugins)/lib:$(find-pkg-prefix building_gazebo_plugins)/lib" />

    <executable cmd="gzserver --verbose -s libgazebo_ros_factory.so -s libgazebo_ros_init.so $(var world_path)" output="both">
      <env name="GAZEBO_MODEL_PATH" value="$(var model_path)" />
      <env name="GAZEBO_RESOURCE_PATH" value="$(var resource_path)" />
      <env name="GAZEBO_PLUGIN_PATH" value="$(var plugin_path)" />
      <env name="GAZEBO_MODEL_DATABASE_URI" value="" />
    </executable>
    <executable cmd="gzclient --verbose $(var world_path)" output="both">
      <env name="GAZEBO_MODEL_PATH" value="$(var model_path)" />
      <env name="GAZEBO_RESOURCE_PATH" value="$(var resource_path)" />
      <env name="GAZEBO_PLUGIN_PATH" value="$(var plugin_path)" />
    </executable>
  </group>
Lastly, instances of the "full control" rmf_fleet_adapter are launched for each robot type annotated in the map. The navigation graphs for each fleet as generated by the building_map_generator script is passed via the nav_graph_file argument. For the office map, a single fleet of Magni robots is defined. Hence, a single magni_adapter.launch.xml file configured with the kinematic properties of this robot type along with spatial thresholds used for planning, is launched. Along with the fleet adapter, a robot_state_aggregator node is started. This node aggregates RobotState messages with RobotState.name containing the robot_prefix argument and publishes the aggregate to /fleet_states with FleetState.name specified by the fleet_name argument.
<group>
  <let name="fleet_name" value="magni"/>
  <include file="$(find-pkg-share rmf_demos)/include/adapters/magni_adapter.launch.xml">
    <arg name="fleet_name" value="$(var fleet_name)"/>
    <arg name="use_sim_time" value="$(var use_sim_time)"/>
    <arg name="nav_graph_file" value="$(find-pkg-share rmf_demos_maps)/maps/office/nav_graphs/0.yaml" />
  </include>
  <include file="$(find-pkg-share rmf_fleet_adapter)/robot_state_aggregator.launch.xml">
    <arg name="robot_prefix" value="magni"/>
    <arg name="fleet_name" value="$(var fleet_name)"/>
    <arg name="use_sim_time" value="true"/>
  </include>
</group>
When testing RMF with hardware, the same launch files can be used, with the exception of starting Gazebo.
More information on running demos with hardware can be found the chapter on Integration.
Task Requests
RMF supports various tasks out of the box. For more information see Tasks in RMF A web-based dashboard is provided to allow users to send commands to RMF. Once the dashboard server is launched, it can be accessed at https://open-rmf.github.io/rmf-panel-js/.

Alternatively several scripts exist in rmf_demos_tasks to assist users with submitting requests from the terminal. Presently the dispatch_loop.py, dispatch_delivery.py and dispatch_clean.py scripts can be used to submit Loop, Delivery and Clean requests.
Conclusion
This chapter covered the utilization of the traffic_editor tool to create annotated maps that allow the auto-generation of 3D worlds for simulations.
It also covered the assets used within simulations and the corresponding plugins necessary for ROS 2 and RMF to interface with them.
A working example of these components running together, in the form of the rmf_demos_maps package, was provided as a reference for how to actualize a custom system.
The next chapter will introduces the basic concept behind RMF.